Difference between revisions of "Cross Section"
| (8 intermediate revisions by the same user not shown) | |||
| Line 5: | Line 5: | ||
= Description = | = Description = | ||
| − | This tool allows the user to define a clipping box ( | + | This tool allows the user to define a clipping box (also called 'cross section') around one or several entities. The box extents and orientation can be manually adjusted. |
'''Since version 2.6.2 this tool can be used on meshes.''' | '''Since version 2.6.2 this tool can be used on meshes.''' | ||
| + | |||
| + | '''Before version 2.12, 'envelopes' were misleadingly called 'contours'!''' | ||
Additionally, this tool can: | Additionally, this tool can: | ||
| − | * repeat the segmentation | + | * segment the entities (slice) |
| − | + | * extract the envelope of all the points inside the slice | |
| + | * extract one or several contours of the points inside each slice (since version 2.12) | ||
| + | * repeat the segmentation or extraction processes above along one or several dimensions (to extract multiple 'slices' for instances) | ||
= Procedure = | = Procedure = | ||
| − | Select | + | Select one or several entities (clouds or meshes) and start this tool. |
[[Image:Cc_cross_section_tool.jpg|center]] | [[Image:Cc_cross_section_tool.jpg|center]] | ||
A dedicated dialog will appear in the top-right part of the 3D view. | A dedicated dialog will appear in the top-right part of the 3D view. | ||
| − | + | Notes: | |
| + | * the initial clipping box is the bounding-box of all selected entities. | ||
| + | * since version 2.7, a button lets the user restore the clipping box defined '''on the same set of entities''' during the previous usage of this tool (next to the 'reset' button, in the upper right part of the dialog). | ||
== Editing the clipping box == | == Editing the clipping box == | ||
| Line 34: | Line 40: | ||
[[Image:Cc_cross_section_tool_edit.jpg|center]] | [[Image:Cc_cross_section_tool_edit.jpg|center]] | ||
| − | Note: you can show or hide the interactors with the | + | Note: you can show or hide the interactors and/or the box with the two icons on the top left part of the dialog. |
=== Numerically === | === Numerically === | ||
| Line 43: | Line 49: | ||
Eventually, if you need more control, you can click on the 'advanced' button. A 'standard' 3D box edition dialog will appear. You can setup the box position in space in various ways (and even force the box to be cubical for instance). | Eventually, if you need more control, you can click on the 'advanced' button. A 'standard' 3D box edition dialog will appear. You can setup the box position in space in various ways (and even force the box to be cubical for instance). | ||
| + | |||
| + | Since version 2.6.3 you can also setup the box axes this way. | ||
[[File:Cc_cross_section_tool_advanced_dialog.jpg|center]] | [[File:Cc_cross_section_tool_advanced_dialog.jpg|center]] | ||
| Line 56: | Line 64: | ||
== Extract a single slice == | == Extract a single slice == | ||
| − | Once the clipping box is defined, you can export the visible | + | Once the clipping box is defined, you can export the parts of the clouds and meshes falling inside the box and still visible as new entities. |
| − | To do this, simply click on the 'Export slice' [[Image:CcClippingBoxSingleExport_small.png]] button (in the right 'Slices' frame). CloudCompare will then create | + | To do this, simply click on the 'Export slice' [[Image:CcClippingBoxSingleExport_small.png]] button (in the right-side 'Slices' frame). CloudCompare will then create new entities and add them to the database tree. |
| − | + | For meshes, origin triangles will be properly cut on the clipping box borders. This is the same behavior as the [[Crop]] method. | |
| − | == Extract a single | + | == Extract a single envelope == |
| − | + | For point clouds, instead of the subset of points or triangles corresponding to the current slice, it is also possible to extract the envelopes of all the points falling inside the clipping box. | |
| − | To do this click on the 'Extract | + | To do this click on the 'Extract envelope' [[Image:SmallPolygonSelect.png]] button (in the left-side 'Envelope/Contour' frame). |
| − | A dialog to setup the contour extraction process will appear: | + | A dialog to setup the envelope or contour extraction process will appear: |
[[Image:Cc_cross_section_tool_extract_contour_dialog.jpg|center]] | [[Image:Cc_cross_section_tool_extract_contour_dialog.jpg|center]] | ||
| − | + | To extract the envelope, the user must: | |
| − | * the 'flat' dimension (''it should be automatically setup based on the current | + | * check the 'Extract envelope(s)' checkbox |
| − | * the maximum ''edge length'': the | + | * select the 'flat' dimension (''it should be automatically setup based on the current clipping box shape''). |
| + | * set the envelope type (Full, Lower or Upper) | ||
| + | * set the maximum ''edge length'': the envelope is extracted thanks to a 'concave hull' extraction algorithm. The only parameter for this tool is the 'maximum size' of a single generated edge. The algorithm starts from the convex hull of the whole set of points. As long as an edge is longer than the specified 'max length', the algorithm will try to split it by using another point in the vicinity (if possible). This way, the envelope will fit the cloud more tightly. So the smaller this parameter is, the tighter the envelope will be. ''Note that this 'maximum edge length' can't be guaranteed as only the input points are used.'' | ||
Additional options are: | Additional options are: | ||
| − | * ''project slice(s) points on their best fit plane'': the | + | * ''multi-pass'': use multiple iterations to try to obtain a better fit (... or a worst sometimes!) |
| − | * ''split | + | * ''project slice(s) points on their best fit plane'': the envelope extraction is done in 2D. Instead of using the slice flatest dimension as projection plane, CloudCompare can project the points on their best fit plane (it can be sometimes better for rather thick slices). |
| + | * ''split envelope(s) on longer edges'': CloudCompare can split the envelope every time an edge is longer than the 'maximum edge length' parameter. In this case, multiple non-closed polylines can be generated instead of a single closed envelope. | ||
* ''visual debug mode'': for debug use (can be used to understand why the algorithm doesn't output what one would expect). | * ''visual debug mode'': for debug use (can be used to understand why the algorithm doesn't output what one would expect). | ||
| + | [[Image:Cc_cross_section_tool_extract_contour_result.jpg|frame|center|Extracted envelope (close-up with the slice cloud)]] | ||
| − | + | == Extract contours inside a single slice == | |
| + | Since version 2.12, it is possible to extract the contour(s) of all points falling inside the current clipping box. | ||
| − | Notes | + | To do it, follow the same process as in the previous section, then: |
| − | * you can easily 'cancel' (delete) the last generated | + | * check the 'Extract contours' checkbox |
| − | * to extract | + | * set the 'Grid step': this is the dimension of the square cells of the raster grid that will be generated with the points falling inside the slice (by projection them along the 'flat' dimension). The larger the grid step is, the coarser the contours will be. But if the grid step is too small, points will be isolated and contours will be very small. |
| + | * set the minimum number of vertices by contour (to avoid generating too small contours around isolated points/clusters. | ||
| + | |||
| + | [[Image:Cc_cross_section_tool_extract_real_contours_result.JPG|frame|center|Extracted contours]] | ||
| + | |||
| + | |||
| + | == Notes == | ||
| + | * you can easily 'cancel' (delete) the last generated envelope or contours by clicking on the 'revert' icon next to the [[Image:SmallPolygonSelect.png]] button | ||
| + | * alternatively, it is possible to extract envelopes with the [[Extract Sections]] tool. | ||
| − | == Extract | + | == Extract multiple slices, envelopes or contours == |
| − | To extract several slices | + | To extract several slices, envelopes or contours at once, click on the 'Extract multiple slices' [[Image:CcClippingBoxMultExport_small.png]] icon (in the right 'Slices' frame). |
CloudCompare will open a dialog: | CloudCompare will open a dialog: | ||
| Line 98: | Line 119: | ||
Most of the parameters are the same as for the 'Single section extraction' dialog (see above). | Most of the parameters are the same as for the 'Single section extraction' dialog (see above). | ||
| − | The user must | + | The user must also explicitly specify if (s)he wishes to generate slices, contours or envelopes (check the corresponding checkboxes). |
Other parameters are: | Other parameters are: | ||
| − | * ''Repeat | + | * ''Repeat dimensions'': the extraction process can be repeated along one or multiple dimensions (by default only the 'most flat' dimension of the currently defined section box will be checked) |
| + | * ''random colors per slice'': if checked, a random color will be assigned to each slice (warning: any existing colors will be overwritten!) | ||
* ''Gap'': a gap can be added between each slice | * ''Gap'': a gap can be added between each slice | ||
| − | * '' | + | * ''Group generated entities by'': since version 2.12, it is possible to organize the generated entities (slices / envelopes / contours) in the DB tree in different ways: |
| + | ** Type: slices, envelopes and contours are separated in 3 groups (''that was the default behavior before version 2.12'') | ||
| + | ** Origin entity: slices, envelopes and contours are generated in the same group, but a different group for each origin entity | ||
| + | ** Slice: slices, envelopes and contours are generated in the same group, but a different group for each slice | ||
| + | ** Origin entity, then slice: combination of the 2 previous options (one group per entity, and under each group, one group per slice) | ||
| + | ** Slice then origin entity: same as the previous one, but the first level groups correspond to the slices, and then sub-groups correspond to each origin entity | ||
| − | [[Image:Cc_cross_section_tool_repeat_result.jpg|frame|center|Multiple slices (left) and | + | [[Image:Cc_cross_section_tool_repeat_result.jpg|frame|center|Multiple slices (left) and envelopes (right) extraction]] |
== Reset the clipping box == | == Reset the clipping box == | ||
Latest revision as of 13:11, 31 March 2022
Menu / Icon
This tool is accessible via the ![]() icon the upper main toolbar or the 'Tools > Segmentation > Cross Section' menu.
icon the upper main toolbar or the 'Tools > Segmentation > Cross Section' menu.
Description
This tool allows the user to define a clipping box (also called 'cross section') around one or several entities. The box extents and orientation can be manually adjusted.
Since version 2.6.2 this tool can be used on meshes.
Before version 2.12, 'envelopes' were misleadingly called 'contours'!
Additionally, this tool can:
- segment the entities (slice)
- extract the envelope of all the points inside the slice
- extract one or several contours of the points inside each slice (since version 2.12)
- repeat the segmentation or extraction processes above along one or several dimensions (to extract multiple 'slices' for instances)
Procedure
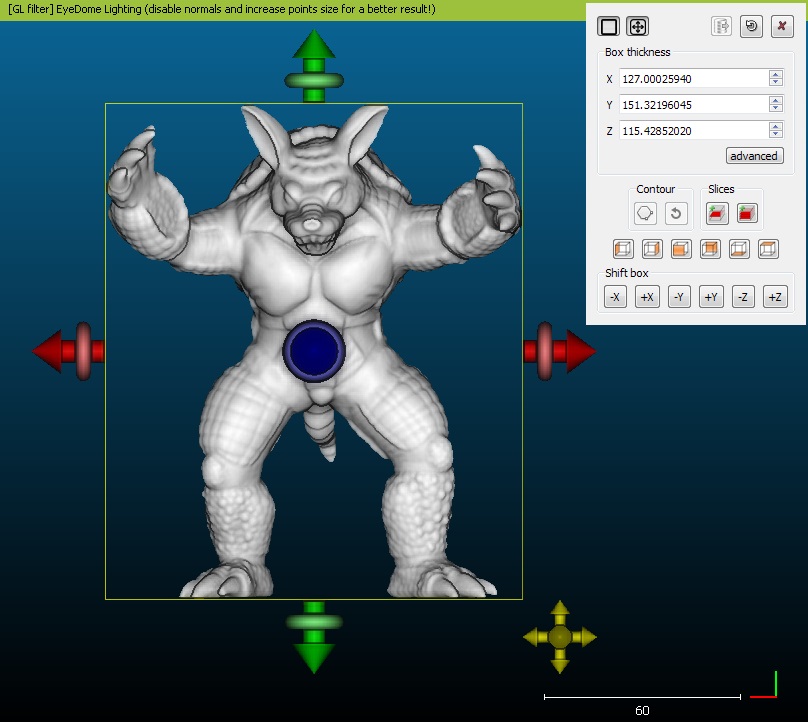
Select one or several entities (clouds or meshes) and start this tool.
A dedicated dialog will appear in the top-right part of the 3D view.
Notes:
- the initial clipping box is the bounding-box of all selected entities.
- since version 2.7, a button lets the user restore the clipping box defined on the same set of entities during the previous usage of this tool (next to the 'reset' button, in the upper right part of the dialog).
Editing the clipping box
The clipping box can be edited in various ways.
Interactively
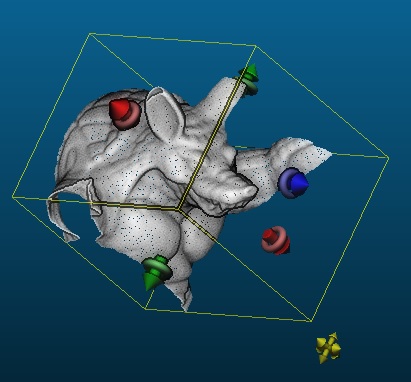
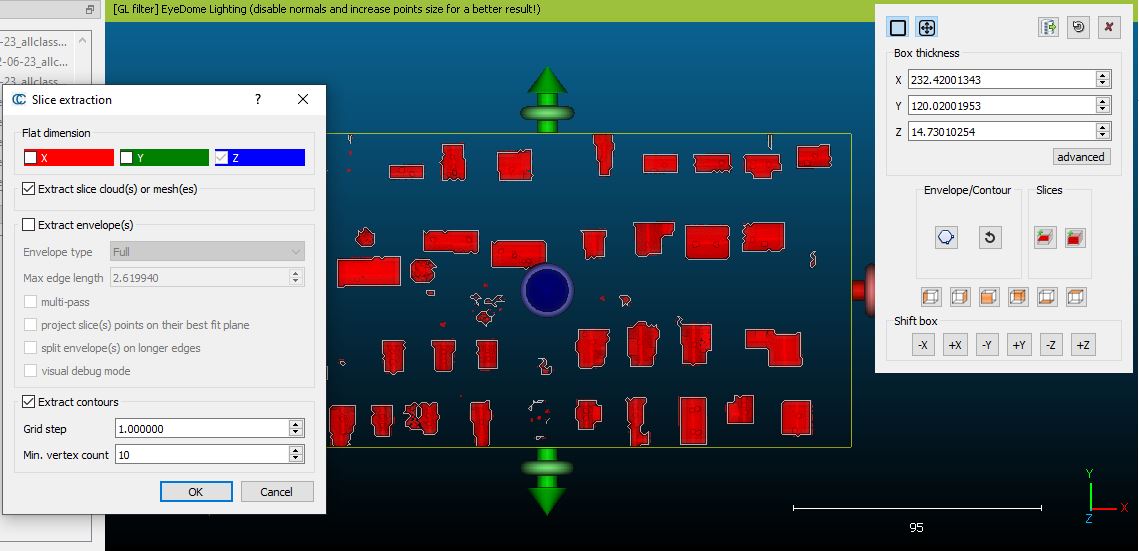
You can drag the 'interactors' (big red, green and blue arrows and tori) so as to move the clipping box boundaries directly in the 3D view. The arrow tips are used to push and pull the clipping box faces, while the tori can be used to rotate the box around the arrow axes.
You can also translate the whole box with the lower-left (yellow) interactor.
Note: you can show or hide the interactors and/or the box with the two icons on the top left part of the dialog.
Numerically
You can directly edit the box dimensions (width, depth and height) with the 'X', 'Y' and 'Z' fields.
You can also shift the box in all directions with the buttons in the lower part of the dialog ('Shift box' frame). The box will be shifted of the same quantity as the box width in this dimension.
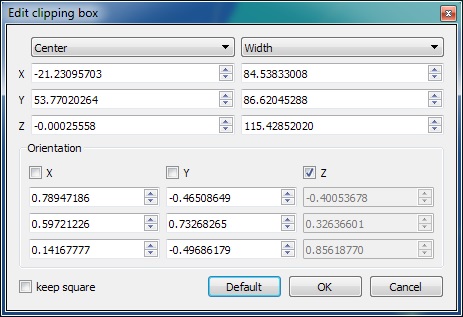
Eventually, if you need more control, you can click on the 'advanced' button. A 'standard' 3D box edition dialog will appear. You can setup the box position in space in various ways (and even force the box to be cubical for instance).
Since version 2.6.3 you can also setup the box axes this way.
Visualization
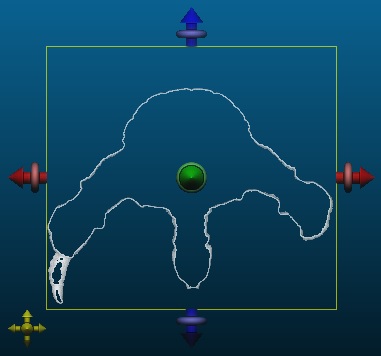
At any time the 3D view camera can be changed so as to face one of the clipping box faces. Use the standard 'predefined views' buttons in the lower part.
It can be useful to hide the interactors as well in order to properly see the current cloud section:
Extract a single slice
Once the clipping box is defined, you can export the parts of the clouds and meshes falling inside the box and still visible as new entities.
To do this, simply click on the 'Export slice' ![]() button (in the right-side 'Slices' frame). CloudCompare will then create new entities and add them to the database tree.
button (in the right-side 'Slices' frame). CloudCompare will then create new entities and add them to the database tree.
For meshes, origin triangles will be properly cut on the clipping box borders. This is the same behavior as the Crop method.
Extract a single envelope
For point clouds, instead of the subset of points or triangles corresponding to the current slice, it is also possible to extract the envelopes of all the points falling inside the clipping box.
To do this click on the 'Extract envelope' ![]() button (in the left-side 'Envelope/Contour' frame).
button (in the left-side 'Envelope/Contour' frame).
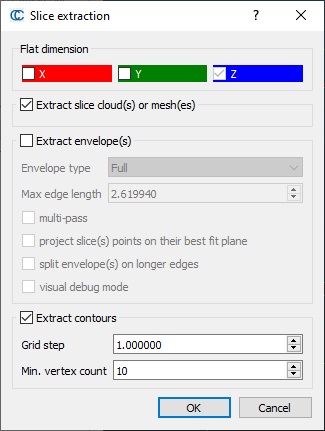
A dialog to setup the envelope or contour extraction process will appear:
To extract the envelope, the user must:
- check the 'Extract envelope(s)' checkbox
- select the 'flat' dimension (it should be automatically setup based on the current clipping box shape).
- set the envelope type (Full, Lower or Upper)
- set the maximum edge length: the envelope is extracted thanks to a 'concave hull' extraction algorithm. The only parameter for this tool is the 'maximum size' of a single generated edge. The algorithm starts from the convex hull of the whole set of points. As long as an edge is longer than the specified 'max length', the algorithm will try to split it by using another point in the vicinity (if possible). This way, the envelope will fit the cloud more tightly. So the smaller this parameter is, the tighter the envelope will be. Note that this 'maximum edge length' can't be guaranteed as only the input points are used.
Additional options are:
- multi-pass: use multiple iterations to try to obtain a better fit (... or a worst sometimes!)
- project slice(s) points on their best fit plane: the envelope extraction is done in 2D. Instead of using the slice flatest dimension as projection plane, CloudCompare can project the points on their best fit plane (it can be sometimes better for rather thick slices).
- split envelope(s) on longer edges: CloudCompare can split the envelope every time an edge is longer than the 'maximum edge length' parameter. In this case, multiple non-closed polylines can be generated instead of a single closed envelope.
- visual debug mode: for debug use (can be used to understand why the algorithm doesn't output what one would expect).
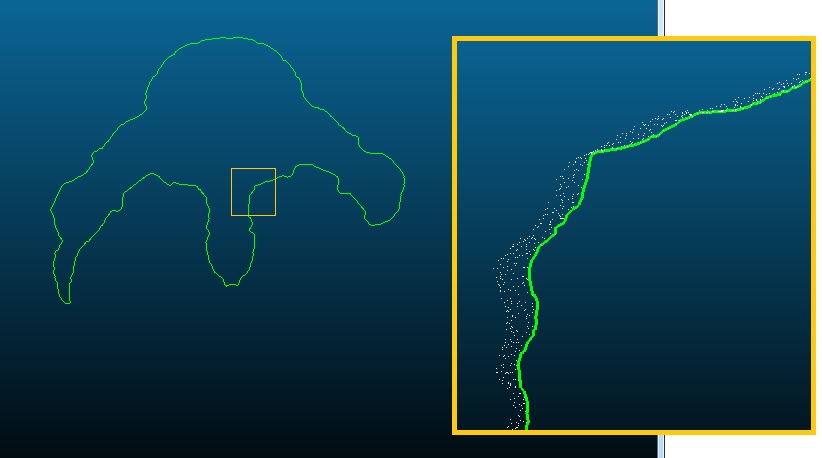
Extract contours inside a single slice
Since version 2.12, it is possible to extract the contour(s) of all points falling inside the current clipping box.
To do it, follow the same process as in the previous section, then:
- check the 'Extract contours' checkbox
- set the 'Grid step': this is the dimension of the square cells of the raster grid that will be generated with the points falling inside the slice (by projection them along the 'flat' dimension). The larger the grid step is, the coarser the contours will be. But if the grid step is too small, points will be isolated and contours will be very small.
- set the minimum number of vertices by contour (to avoid generating too small contours around isolated points/clusters.
Notes
- you can easily 'cancel' (delete) the last generated envelope or contours by clicking on the 'revert' icon next to the
 button
 - alternatively, it is possible to extract envelopes with the Extract Sections tool.
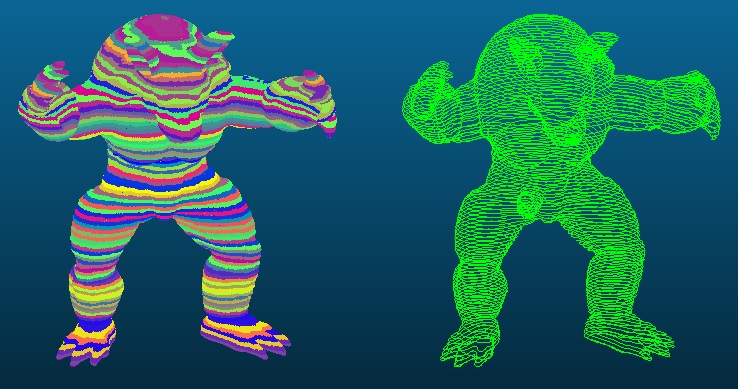
Extract multiple slices, envelopes or contours
To extract several slices, envelopes or contours at once, click on the 'Extract multiple slices' ![]() icon (in the right 'Slices' frame).
icon (in the right 'Slices' frame).
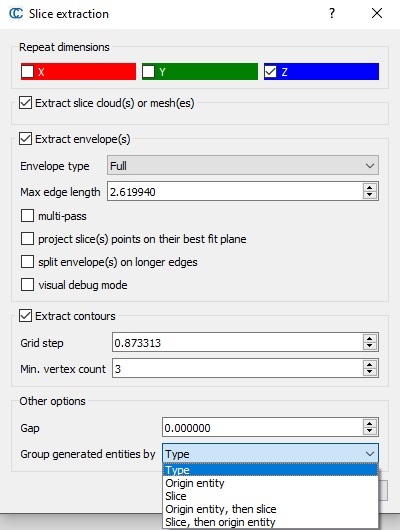
CloudCompare will open a dialog:
Most of the parameters are the same as for the 'Single section extraction' dialog (see above).
The user must also explicitly specify if (s)he wishes to generate slices, contours or envelopes (check the corresponding checkboxes).
Other parameters are:
- Repeat dimensions: the extraction process can be repeated along one or multiple dimensions (by default only the 'most flat' dimension of the currently defined section box will be checked)
- random colors per slice: if checked, a random color will be assigned to each slice (warning: any existing colors will be overwritten!)
- Gap: a gap can be added between each slice
- Group generated entities by: since version 2.12, it is possible to organize the generated entities (slices / envelopes / contours) in the DB tree in different ways:
- Type: slices, envelopes and contours are separated in 3 groups (that was the default behavior before version 2.12)
- Origin entity: slices, envelopes and contours are generated in the same group, but a different group for each origin entity
- Slice: slices, envelopes and contours are generated in the same group, but a different group for each slice
- Origin entity, then slice: combination of the 2 previous options (one group per entity, and under each group, one group per slice)
- Slice then origin entity: same as the previous one, but the first level groups correspond to the slices, and then sub-groups correspond to each origin entity
Reset the clipping box
You can reset the clipping box to its original state (i.e. the cloud bounding-box) anytime by clicking on the 'reset' ![]() button in the upper right part of the dialog.
button in the upper right part of the dialog.
Close the tool
You can close the tool by clicking on the 'red cross' ![]() button in the upper right part of the dialog.
button in the upper right part of the dialog.
